Ubiquiti Erx is There an Easy Way to Plan and Upload Static Dhcp Assignments
When you play online games a fast and steady internet connection is really important. Nothing is so frustrating as high latency which will cause lag and ruin your online gaming experience. I have played online games a lot when I was younger, so I know everything about it when it comes to lag and gaming experience.
What surprises me is are gaming routers, claim to be the solution for your connection problems and they cost a lot of money. But as an IT Guy with more than 15 years' experience, I can tell you they are a waste of money. You can better buy the Edge Router X and spend the rest of your money on games.
In this article, I will explain to you why the Edge Router X (that cost only $50) is the best gaming router that you can buy. We are going to prioritize our network traffic for online gaming, optimize our network with the fastest DNS servers and if you can't use a wired connection, optimize the WiFi network as well.
The root cause of the network problems
Before we are going to the solution, first let's take a deeper look at what causes the network problems with online gaming and how gaming routers or routers, in general, can solve the problem. If you are playing online you want the network packages from your PS4 or Xbox to get to the game server as fast as possible. Most people think that a fast internet connection is a solution to play without lag.
But to play online you only need an internet connection with 2 Mbit/s upload, even 1 Mbit/s will do fine in most cases. The lag that you are suffering from comes due to high latency, the time it takes to send the package to the server and get the response back. Common causes for this are:
- You are connected over WiFi. WiFi networks can suffer from interference or congestion. Use a wired connection to start with. (if not possible, keep reading)
- Buffer Bloat, your router is pushing more data on the internet connection then your connection can handle. This will cause the buffers to overfill resulting in delays and high latency
- Bad network cable. Replace it with a Cat5E or Cat6 cable
Test your current network setup
To test your internet connection, you can use DSLReports.com. This is one of the best speed tests on the internet and will give you a good insight into the quality of your internet connection. When you are running the test, make sure nobody else is using the network and plug your computer straight into the router.
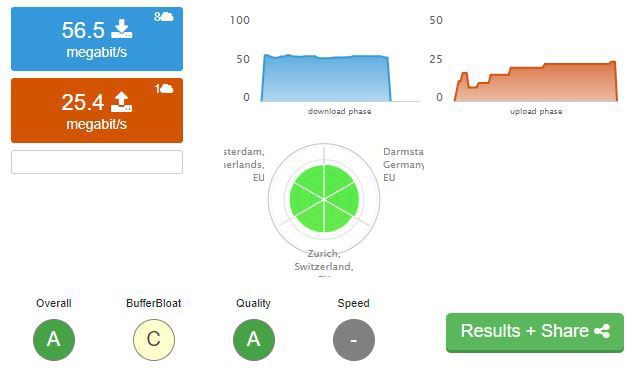
Start the speed test on DSLReports, what we are looking for are three A's atleast. But you probably end up with a C or D for the buffer bloat. If you BufferBloat is anything lower then A+ or A then you will experience ping spikes and packet loss while you play online.
What causes buffer bloat
When you play online and you are the only one using the internet connection, you probably won't have any issues. The problems start when some else in your household is using the internet connection. If they are streaming video (Youtube/Netflix), listing to Spotify, or download/uploading files (syncing dropbox/onedrive/photo's from your mobile) you will notice it immediately.
The router is pushing all the network traffic to your internet connection, while not prioritizing your online gaming traffic. Besides that, will it push more data on the internet connection then it can handle, resulting in a buffer overflow. Also, know as buffer bloat.
The problem with Gaming Routers
So let me explain why you should not invest your money in those expensive gaming routers:
Gaming routers are designed to prioritize network traffic, which is good. Only the way they do it isn't always that efficient and you are paying a really high price for it. Some are using an online database with IP address they need to prioritize, others only prioritize per device (they give your game console all the bandwidth which isn't the solution).
Al that needs to be done is prioritize data from real-time applications (online games). This can be done with SQM (Smart Queue Management).
Gaming routers and wireless networks
Another issue with gaming routers is that they provide a wireless network. Most consumer routers do that, but that is completely the wrong way to design a home network. You want to place your access points near the devices that are using the wireless network. Wall, doors, floors, everything between your router and the wireless client will obstruct the wifi signal.
They come with 6 or even 8 external WiFi antennas, maybe using unlicenced WiFi channels to avoid interference but in the end, you are still placing the router in the wrong location. A router needs to be placed close to your internet connection. But that isn't the place where you will be using the wireless network. They solve this by adding more antennas, but what you really should do is place an access point near your gaming device.
Another problem with the WiFi of gaming routers, some routers come with massive wireless network speeds, up to 3,200Mbps, or even 5,334Mbps. Completely pointless, the newer PS4 models support 802.11ac, which can, in theory, reach only 1,300 Mbps. And your internet connection is maybe 100Mbps down and 20Mbps up, so anything faster than the 802.11ac is pointless.
The price of gaming routers
Then the price, a good gaming router cost between the $200 and $400. They may look really nice and the specification looks great (more is better.. ) but if you look into the details and into the real problem of what causes the bad online gaming experience, then it's just too much money. The Edge Router X will cost you around the $50, leaving you with money to spend on an extra access point.
The Best (Gaming) Router
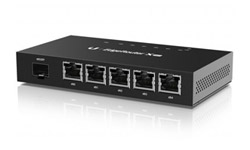
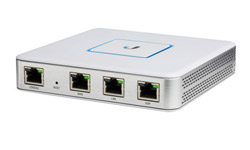
The best gaming router in my opinion, from a networking standpoint, is the Edge Router X from Ubiquiti. Now I normally recommend the Unifi product line from Ubiquiti for home networks. Unifi is a bit easier to manage with the Unifi Controller. But the Unifi Security Gateway (USG) is a bit more expensive and has a slower processor.
The processor is important for the Smart Queue Management, the USG can only handle an internet connection up to 60Mbit. Where the Edge Router X can handle traffic between the 100 and 250 Mbit/s. Now always take the lower number for granted, so the Edge Router X be used for internet connections up to 100Mbits/s.
 |  | |
| Edge Router X (ER-X) | Unifi Security Gateway (USG) | |
| Processor | Dual-Core 880 MHz | Dual-Core 500 MHz |
| Smart Queue Shaping Performance | min 100Mbit/s | max 60Mbit/s |
| Gigabit RJ45 ports | 5 | 3 |
| Price | Around $50 | Around $120 |
Now the Edge Route X nor the USG come with WiFi, so if your current router also provides the wireless network in your house, then you need an access point. The Unifi access points are one of the best that you can get. The price of an Unifi Access Point starts at $ 80 for the AC-Lite, so the router and access point combined are still cheaper than those expensive gaming routers.
Setting up the EdgeRouter X
So we are going to set up the Edge Router X (ERX). The best way to do this is by connecting it straight to your internet connection. You will need the PPPoE credentials for your internet connection. Contact your ISP for the details. Unfortunately not all ISP support this, including mine. That doesn't mean you can't benefit from the EdgeRouter X. We are simply changing the router from the ISP to forward all the traffic to our router (we put it in bridge mode).
Before we change anything to our network, we need to download first the latest firmware for the ERX. I noticed that updating the firmware of the ERX can result in setting up the internet connection again (or reloading the configuration if you made a backup). So let's start with updating the ERX.
Updating the EdgeRouter X
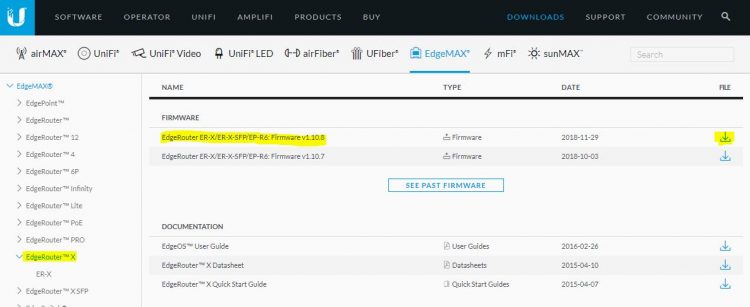
- You need to download the latest firmware for the ERX on ubnt.com. Go to download and select the EdgeRouter-X on the left side. Download the latest firmware for the router.
- Connect your computer to the Eth0 port on the ERX and power the ERX up
- We need to change the local IP address on your computer to match the one from the ERX. Click on Start and runNcpa.cpl <enter>.
You now see your network connections
- Select the Ethernet Network and click on Properties in the context menu.
- Click onIPv4 and click on Properties
- Select Use the following Ip address
– 192.168.1.10 and set the gateway to 192.168.1.1 (the IP address of the ERX) - Click on Ok and close all the windows
You can now open the webpage of the ERX, open a new browser window and navigate to http://192.168.1.1. Ignore the security warning (Show Advanced > Proceed) and login to the ERX. The default username and password are:
Username: ubnt
Password: ubnt
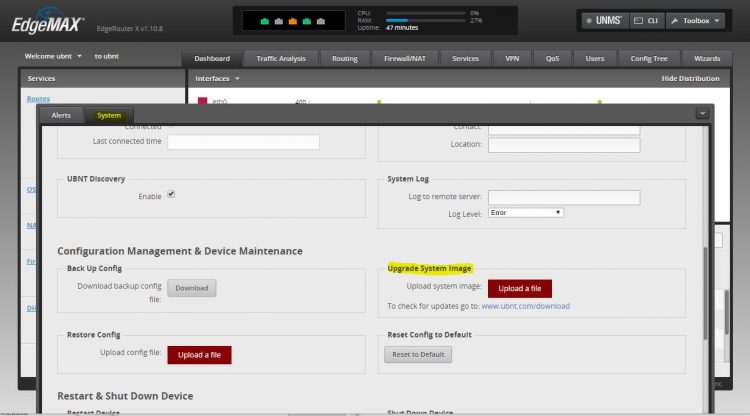
You will now see the dashboard of the ERX. On the bottom, you will see a black menu bar with Alerts and System. Click on System and scroll down to Upgrade System Image. Upload the just downloaded firmware update. Uploading and installing the new firmware will take a couple of minutes. Just wait until you are asked to reboot the router.
So we now have the latest firmware installed on the Edge Router X. Now it's time to start configuring the router.
Setting your old router in Bridge mode (optional)
If you got the PPPoE credentials from your ISP then you can use the PPPoE connection type during the basic setup wizard. But if you need to use the router supplied by your ISP, then we need to set your current router into Bridge mode.
Disconnect your computer from the Edge router and plug it back into your old router. Make sure you change your ethernet connection back to DHCP mode (Obtain an IP Address Automatically).
How you set your router in bridge mode is different for each router. So the best thing is to look up the user manual. But in general, you can follow these steps:
- Find your routersIP address
- Click onStart and type CMD <enter>
- In the black dos box, typeipconfig<enter>
- Note your default gateway address
- Visit the router's IP address in a new browser tab. (http://192.168.1.1) in my case (yes the same as the ERX)
- Look for the internet settings page
- Find theEnable Bridge mode orEnable DMZ mode
If your old router is in the same network range (192.168.1.x) as the ERX (like in my case), then you will need to change the IP address of your old router. Find the local network settings in your old router. Change the routers ip address to 172.16.0.254 and set the dhcp range to 172.16.0.100 to 172.16.0.200.
Setting up the internet connection
We are going to set up an internet connection on the ERX. First make sure you connected the EdgeRouter X to the internet (to your modem, old router, or straight to the internet connection). Use the port Eth0 for this and connect your computer into Eht1
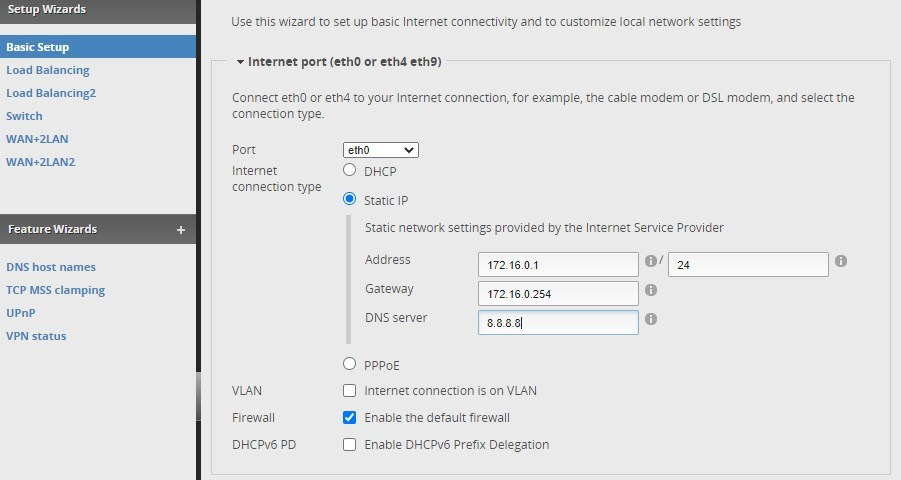
- Click on Wizard in the menu (completely right) and select Basic Setup
- Select the Port eth0
- Internet Connection type (DHCP, Static of PPPoE). If you are using your old router, choose Static IP.
- The Ip Address must be in the same range as your modem or old router
- Set the DNS to 8.8.8.8 (Google DNS server), we will optimize it later
- Open the LAN Ports section.
- Here you can configure the DHCP server. I recommend setting the network range to the same as it was before. This way you don't need to change the IP address of your printers for example.
- Scroll down to User Setup
- Change the default password to something unique and click on Apply
The router will reboot and will use the new configuration. You can now change your Ethernet Connection from your computer back to DHCP mode (option IP address automatically). After the router is rebooted you can log in again using the new password.
If everything went right, then you should be able to access the internet through your EdgeRouter X. Before we start with configuring the SQM, we first need to know the real speed of your internet connection. Run another speed test on DSLReport.com. Write down the upload and download speed of your internet connection.
If you are using a cable modem, then make sure you're run the test for more then 10 seconds. Cable modems are known to use a speedboost technique giving your 10 Mbits/s extra for the first few seconds. Keep it running a bit longer and you will notice a drop in the internet speed. Take that number.
Setting up QoS for Gaming
The whole point of this article is to optimize the router for gaming traffic. If you search online you will find a lot of articles telling that QoS (Quality of Service) is the solution. But setting up QoS requires you to configure the priority for different ports and protocols. This isn't a viable option for online gaming.
SQM, on the other hand, is designed to optimize the behavior for all applications with minimal configuration. It is a combination of better packet scheduling (flow queueing) and active queue length management (AQM).
Configuring SQM in the EdgeRouter X
We are going to apply the Smart Queue Management to both the upload and download traffic. In the EdgeRouter X open the QoS tab.
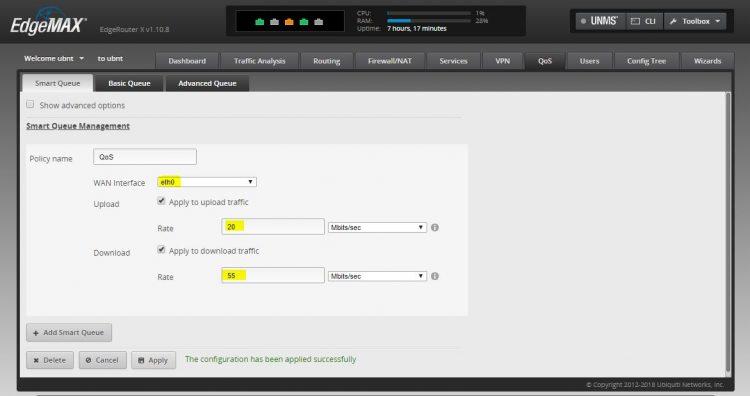
- Give the policy a name
- Select the interface to your internet connectionEth0 (or PPPoE0 if you are using a PPPoE connection)
- Fill in the upload and download bandwidth from the speedtest
- Click on Apply
Run the speedtest on DSLReport.com again, you will now see that there is no buffer bloat and your rating should be an A or A+. If the buffer bloat is still too high, then you need to lower the up and download ratings.
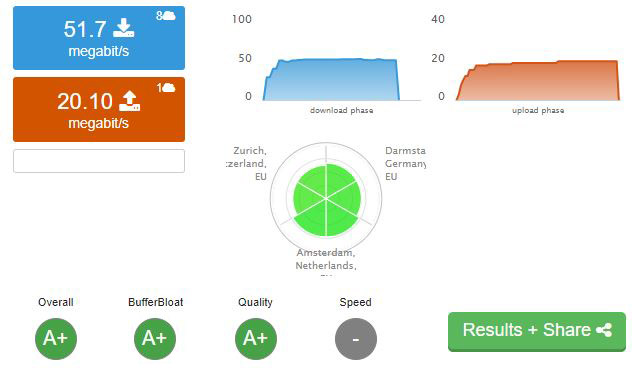
Now you might need to fine-tune the upload and download rate a bit. I started with a lower rate then the speedtest showed and adjusted the up and download speeds until the latency increased. Don't fine-tune both the same time. Start with finetuning the download entry and then the upload. Settle with a slightly lower value for the best results.
In my result, you see that the Mbit/s is a few Mbit lower than with the consumer router. Speed isn't everything, a stable connection, without any lag is much more important. Especially when you play online.
Finding the fastest DNS server
During the basic installation, we enter the Google DNS servers, but as I mentioned we are going to optimize the DNS as well. First, why is the DNS server important? Almost everything you do online requires the DNS server to translate a hostname to it's IP address. The faster the DNS server, the faster your computer can send or request the necessary data. The differences between the fastest server can be up to 30ms or more.
Now we can settle with the DNS server that is ranked the fastest by the independent DNS monitor DNSPerf.com. At the moment 1.1.1.1 is the fastest DNS server in the world. But what is fast for you can be different than for someone else. It all depends on where you and the DNS server is located in the world.
To find the fastest DNS server for your internet connection you should run the free DNS Benchmark tool. This tool will lookup all the nameservers Download the tool and open it.
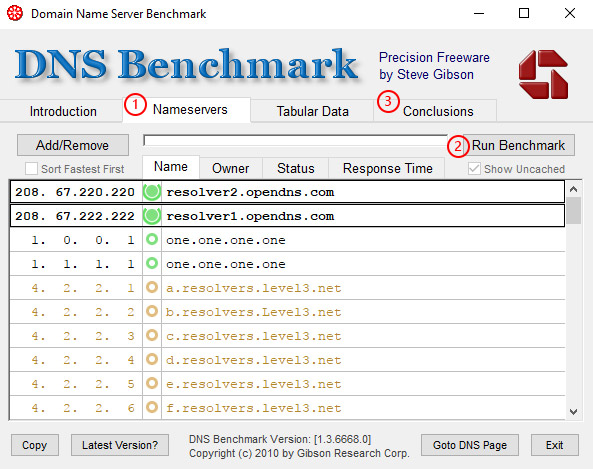
- Click on the Nameservers tab. Wait a few seconds so it can update the list of nameservers.
- Click on Run Benchmark to start testing
- Read the Conclusions
When the benchmark is completed with the built-in list, it will show you the option to build a custom list. While it takes some time to build the list, I really recommend you still take the time to build it. Click on Build Custom List(this can take up 10 min or more) and run the Benchmark again.
Note the two fastest DNS Server, we will configure it in the DHCP server of the ERX.
Configuring the DHCP Server
We have finetuned the router and on your computer, you can now play games really fast without any lag. But we also need to make sure other devices can be connected to your network and get the right DNS servers. During the basic installation, the built-in setup wizard has already created a DHCP Server. But we want to change the DHCP scope, so we can use fixed IP Addresses for some devices, and add the DNS servers to it.
- In the ERX, go to Services
- Click on Actions and select View Details
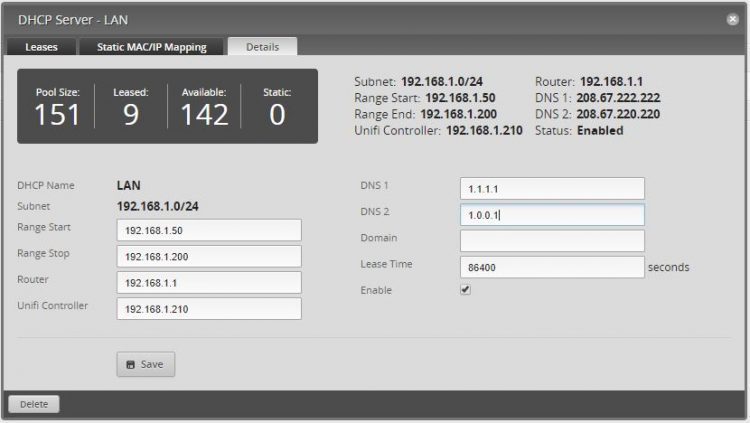
DHCP Range
I like to reserve the DHCP range above the .200 for devices with a static IP address. Think of your Unifi Controller, Access Points, and other network devices. So I recommend changing your range so it starts a 192.168.*.50 and ends at 192.168.*.200.
Router
The address for the Edge Router itself. Leave it as it is, the clients need to know where to find the gateway.
Unifi Controller
If you have an Unifi Controller installed in your network, then enter here the address of it. Setting the Unifi Controller field we create a DNS port forward for Unifi. This will help UniFi devices to automatically discover the location of the UniFi Controller and it smooths the Discovery and Adoption process for Unifi devices.
DNS 1 and 2
Add there the two DNS servers from the DNS Benchmark. These are the DNS servers that your clients will be using.
Setting up the WiFi network
The Edge Router X doesn't come with WiFi so you will need an access point for that. I have written before about the Unifi Access Point, so for installing the Unifi AC and tips for the best wireless network performance, you can check this article.
Make sure you pay attention to the RF Environment scan part to find the channel that is used the least in your area.
Conclusion
We are pretty much done with the configuration of the EdgeRouter X. As always, make a backup of the configuration. In the Edge Router X, click on system (on the bottom of the screen), scroll a bit down and download a backup of the configuration.
With the ERX now installed your online gaming experience should be improved. This configuration doesn't only help with online gaming, but it will also improve VoIP calls and Video conferencing. If you have any question, just drop a comment below. And please let me know the results of your network improvement after you installed this setup.
Source: https://lazyadmin.nl/home-network/best-gaming-router/
0 Response to "Ubiquiti Erx is There an Easy Way to Plan and Upload Static Dhcp Assignments"
Post a Comment